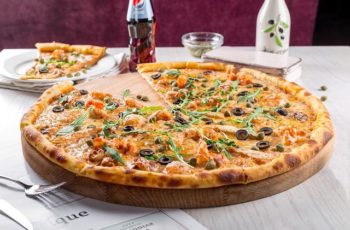
Pizza on the grill is a great summer meal. It’s quick and easy to prepare, and can be made with just about any toppings you want. The best part of all? You don’t even need an oven! With your pellet grill, you can enjoy pizza in minutes on a hot summer day. Pizza night is a family tradition for many families. It’s an easy meal to make, and kids love it! But what if you’re not cooking on your oven? What are your options?
The recipe we’ll be using for this tutorial involves cooking the dough first before adding the toppings and then finishing it off by grilling them together until they’re golden brown and crispy! We’ve also included some other recipes that may work better depending on what toppings you like or if you are looking, How to cook a frozen pizza on a pellet grill.

How to Cook a Frozen Pizza on a Pellet Grill?
Since all pellet grills require different cooking times, we recommend that you use your manual as a guide.
A lot of people who have a pellet grill don’t know how to cook a frozen pizza on it. In this blog post, I’ll show you the steps that you need to take in order to get your frozen pizza cooked on your pellet grill.
1) Preheat your pellets for 10 minutes before cooking the pizza. 2) Place the aluminum foil directly under where you will be placing the pizza and only use one layer of aluminum foil with no holes or perforations. 3) Use a spatula or metal tongs when removing from heat so as not to touch any hot surfaces with bare hands. 4) Let cool completely before serving!
Pellet grills differ from traditional gas or charcoal grills in that they require wood pellets as fuel instead of propane or natural gas. The main difference between other types of grills lies in their heat distribution systems (i.e., direct vs indirect heat).
A frozen pizza is one of the most convenient things to cook on a pellet grill. It’s quick, easy and affordable. The question that many people have is how long does it take to cook a frozen pizza on a pellet grill? How to cook a frozen pizza on a pellet grill? Read this blog post for all you need to know about cooking your favorite food in your favorite appliance.
Table of Contents
Thaw out the frozen pizza
First, let’s clarify why pizza must be thawed before cooking it. The main reason for this is that the moisture contained in the frozen pizza begins to boil once it starts to heat up. This causes pockets of wet steam to form within the dough which subsequently weakens its structure; the end result is that you end up with a limp and soggy crust.
Many people like their pizzas soft and tender (especially children); however, if you want your pizza crust crunchy-crisp, try this simple trick: put your raw pizzas directly on the oven rack or grill rack (with or without their pans) for 5 minutes before baking them at the temperature stated in the recipe. This will harden the outer layer of dough and cook it just enough to prevent it from getting soggy later on.
As stated in my previous article, you only want to pre-cook the crust for just long enough to heat it through and stiffen its structure. Leaving your raw pizza in the oven for too long (more than about 10 minutes) will result in a tough, dry-flavored shell which is not nearly as tasty as one that has been baked immediately after being topped, so keep an eye out while you’re checking your pizza for doneness by lifting up its edge with a spatula or tongs.
How to cook a frozen pizza on a pellet grill? This observation is even more important if you decide to use a baking stone instead of a baking pan. Using a stone will improve the crispness and crunchiness of your pizza crust because it absorbs all moisture from the bottom of the dough, allowing it to cook up tough and dry which adds to its true artisan flavor.
The other main reason for thawing frozen pizzas is that they take too long to cook if you don’t. Consider this: a 9″ slightly thick (~1/4″) pizza takes about 25 minutes at 350°F (177°C) in an average oven. If you buy a pre-frozen ‘just add sauce and cheese’ brand pepperoni pizza, expect it to be around 8″ wide by 1/2″ thick which will take approximately 30 minutes at 350°F (177°C) to cook. This means that you will end up with a much bigger and thinner crust, one that will taste bland and tough even if you pre-cook it for 5 minutes in the oven because the dough was not thawed before.
Most common home ovens use what is called an ‘electric resistance’ heating system which simply means they produce heat by electrically heating coils located in their lower and upper cavities (bottom and top elements). Once turned on, these coils get very hot – so hot that they can burn your pizza if left under them for too long.
The lower coil in an electric resistance oven is used to cook the bottom of your pizza, while the upper element is used to cook its top. Most electronic home ovens are set with both thermostats at their maximum setting (usually 550°F, 288°C) which means that when both elements are turned on they produce a combined cooking heat of about 1100°F – more than enough heat to fully cook any common frozen or fresh pizza within about 15 minutes. However, this heat can easily char the crust by the time the cheese melts so most people leave their ovens set slightly below their maximum settings using either the grill function or simply turning off one of the two heating elements once pre-heating is done. If you have an older oven that only has one thermostat knob, then move it back and forth from one end of its range to the other a few times before cooking your first pizza. This will help ‘burn off’ any dust or dirt particles left over from manufacturing which could overheat while cooking if left too close to the heat source.
You may like this: Top 6 Best Flat Top Grills Reviewed in Detail
What is the temperature to cook the frozen pizza?
A pellet grill is a modern outdoor cooking appliance that has many similarities to a traditional indoor kitchen oven. It is used to cook food in a similar manner in which a traditional oven would, by baking, roasting, searing and smoking. Pellets are available from most manufacturers of pellet grills and can be ordered directly from the company over the phone or on its website. Some pellet grill companies will ship directly to consumers while others require customers to place orders through retailers such as Amazon.com or other online retailers where the grills are sold under different brands or at lower prices because large chain stores offer deep discounts on these products since they purchase pellets in bulk from distributors who carry only one brand name product line.
The grill was invented by Steven Raichlen in the 1980s. The design was improved by Yutaka Kanazawa, a Japanese engineer who produced the first pellet grill using an electric-powered fan to distribute heat evenly over the cooking surface. Because propane is used as a fuel source, pellet grills have a cleaner flavor than traditional grills since they do not give off carbon monoxide and other combustion gases that are present in conventional wood or charcoal grills.
Pellet grills work by throwing a small number of pellets into a metal drum which then feeds them into a powered auger at speeds ranging from 200 RPM up to 1200 RPM depending on how much power is being used from the auger motor. The auger then feeds the pellets into a burn pot where temperatures inside can exceed 500 degrees Fahrenheit. The metal drum is water-cooled to lessen the temperature increase inside the grill and to prevent “hot spots” which can char food. A digital control panel mounted on top of the grill allows users to adjust temperature levels and a smart-chip computer system regulates pellet feed so that pellets are not wasted while cooking or when the auger motor is off.
How to cook a frozen pizza on a pellet grill? The temperature to cook the frozen pizza in the pellet grill is 550°F on a high rack.
We recommend that you add the frozen pizza on a high rack and set for 550°F with an internal cheese or baked crust of at least 160°F. This will allow for adequate preheat time to cook a frozen product if it is not placed directly above one of our heat sources (i.e., meat probe, lava rock). If you do not have a probe thermometer available place your hand underneath the top cooking grate while open. You should only feel light warmth at arm’s length when inserting your hand 6″ to 8″ below the top cooking grate and you should be able to count to 3 before pulling your hand out.
The best way to keep a frozen pizza warm in a pellet grill (regardless of brand) is with an aluminum foil pan. You can use either the standard size or the deep pan depending on what fits inside your grill. This method works well whether you are adding pre-cooked pizzas or cooking them from scratch at a later time, but it requires additional equipment and might take up valuable storage space if you have limited options for storing extra equipment while not in use. If possible, try and find a spot near where you are cooking the pizzas to store the aluminum pans.
Place the frozen pizza on a pre-heated cast iron skillet or baking sheet
Place the frozen pizza on a pre-heated cast iron skillet or baking sheet.
Cook until the underside is “sizzling” and browned, about 10 minutes.
Take care not to overcook or burn it, which can happen quickly! Carefully remove crust from pan with a spatula, flip over so the uncooked side is now facing down on the pan. Return to oven for 3-4 minutes (longer if you like your crust crispy). Repeat flipping process one more time to achieve maximum crispness/texture. Serve immediately!
The post-oven pan searing process gives the crust a nice, even browning. The skillet acts as an oven proof frying pan which gets very hot and seals in the moisture to give you that crispy bottom without being too doughy or dry.
The cooking time will depend on how thick your frozen pizza is, so watch it closely! I’ve found that thin crust pizzas are perfect after 10 minutes in a 500 degree F oven. Thicker crusts may need another 5 minutes so be sure not to overcook! Just because it’s coming out of the oven doesn’t mean it’s done yet. You can always pop it back into the oven if your crust isn’t quite crispy enough yet. Don’t be afraid to experiment!
You can find cast iron skillets at most department stores or online retailers such as Amazon.com . Be sure to use one that is safe for high temperature ovens, like a pre-seasoned pan (they’re not all created equal – some require special seasoning).
If you don’t have a cast iron skillet, any baking sheet will do – although I’ve found that thicker and darker aluminum pans tend to cook the crust too quickly and burn it (learn from my mistakes!). A baking stone would also work really well since it conducts heat evenly for those of you without access to cast iron.
How to cook a frozen pizza on a pellet grill? Cook the pizza on the first side for about 5 minutes, until you can see that it is browning. Flip the pizza over and place on the other side of the pan (or if using a baking sheet, place in an oven pre-heated to 450 degrees).
Add some shredded cheese on top of your partially cooked pizza, then return it to the oven. Allow it to cook for another five minutes or so until both sides are golden brown and crispy. Remove from oven and allow to cool slightly before cutting into slices (a bench scraper makes this job much easier)
Now you know how to cook frozen pizzas like a professional chef! Try cooking up several at once and having ready when friends come over! And remember to experiment, there are many different brands out there with different toppings – sometimes at half-time during events well worth it for a fun party activity!
Place frozen pizza on the grill and cook for 10-12 minutes, or until the cheese is melted and golden brown
This article is intended as a reference only with one recommended cooking method. For more detailed information on grilling, visit our “How-To Grill” articles section. As a reminder, never leave the grill unattended while in use!
4 servings per pie – 242 calories per serving – total weight of pizza before cooking = 9.9 oz
– 1 frozen low-carb, high-fiber pizza dough shell – 7/8 cup of Newman’s Own Olive Oil & Roasted Garlic Pizza Sauce – 1 12 oz package light Mozzarella cheese, shredded (or part skim) – 2 Tbsp fresh grated Parmesan cheese Instructions:
Preheat grill to medium-high heat. Prep your work area by spraying a sheet of aluminum foil with pan spray and place it on the countertop next to the stovetop. Also have a pastry brush or silicone basting brush ready, along with a pair of tongs and a large bowl or plate near the stove for holding any excess sauce.
The crust: If your pizza shell has been in the freezer for a while, it will take longer than normal to thaw and rise. Plan accordingly by allowing a minimum of 45 minutes for it to come up to room temperature after removing from the freezer. Pre-heat oven at this point to 350 degrees if you plan on using your oven instead of a grill for cooking your pizza.
Pre-baking or par-baking the crust is recommended when using low-carb doughs, since they tend to be thicker/denser and therefore require additional cook time on top of any baking instructions listed. Using frozen pizza shells means no pre-baking is required! Just brush with sauce + toppings and throw on the grill.
Preheat a cast iron or other heavy, large-sized skillet on medium-high heat and add 2 Tbsp cooking oil (use olive oil with garlic if you have it; even plain old canola will do). Spread the oil around the pan using a silicone basting brush as needed to coat all surfaces of the pan. Pre-baking according to package instructions for about 5 minutes will help ensure that your frozen pizza shell does not stick later when grilled. Remove from oven or stovetop and set aside for now.
Prepare your toppings: Drain any excess liquid off of diced onion and green peppers before adding them to your sauce. Drain tomatoes first then dice up fresh basil leaves into thin strips/chiffonade. Shred 1 cup of mozzarella into 2-3 inch long strands by running a knife along the edge of a block of cheese from top to bottom, then rolling it up like a cigar.
Prepare grill for cooking: Preheat your gas or charcoal grill on medium-high heat until the metal is hot and slightly smoking (about 10 minutes). Scrape cooking grate clean with wire brush and oil lightly with canola oil spray before putting crust down. Grill should be at least 5 inches away from flames/coals if using gas and about 3 inches or less for grilling over direct heat in your charcoal grill.
Place frozen pizza shell on grill and cook covered, checking every couple of minutes after 10 minutes have elapsed. After about 10 minutes, you should begin to see the cheese bubble and brown slightly. This means it’s time to check your pizza!
When cheese is bubbling, browned on one side, use tongs or grill mitts to carefully flip crust over so that the browned side is now facing down. Add sauce, toppings as desired onto the clean, hot surface of the grill using your basting brush for spreading around any excess sauce/oil after removing excess oil from crust by blotting it with a paper towel. Repeat process until all pizzas are complete.
Place fire-side down first to avoid burning through the bottom of shell because cheese overcooks quickly due to direct heat exposure. Avoid moving around too much because you run the risk of dropping it on the grill or worse, falling over. Repeat with remaining pizzas.
Carefully remove pizza shell from grill once cheese has melted and sauce is bubbling all around edges (about 6-10 minutes). Use tongs/grill mitts to carefully lift off hot metal disk (it will be HOT) and place it on aluminum foil sheet still sprayed with non-stick pan spray; use oven mitts for this step if needed. Place desired amount of shredded mozzarella, parmesan cheese on top of finished shell(s) before transferring them to a large plate or cutting board. Let rest 5 minutes before serving so that cheese has time to set slightly but not completely harden yet.
Read more: Top 10 Best Smokeless Indoor Grill
Remove from heat when toppings are cooked thoroughly and cheese is melted
Many people like to leave their pizza in oven for longer than necessary or until the crust becomes as hard as a rock just so that they can enjoy crispy base. However, once you do that, you’re inevitably going to start burning the cheese which will result in an unpleasant bitter aftertaste. There are some other reasons why it’s better to remove from heat as well but those are pretty much already explained by other users on this thread so I’m not going to repeat them.
The excess heat from the oven transfers into steam, which is why pizza crust seems “soft”. It will continue to cook during the time it takes to cut and serve. The more moisture that escapes as steam, the more condensed flavor in your crust. This is why you see some pizzas being cut on a cutting board with a slant edge so any wayward drippings have an easier path of escape rather than sitting on top.
In order for this condensation to happen, water must be present. If the surface temperature of a pizza is high enough or if you try to serve a pizza shortly after baking, no matter how much patting down of wet ingredients took place before going into the oven, there will still be some adequate moisture to cause this effect, which will continue until the crust cools.
The oven door is opened so frequently during baking that this transfer of heat from cooling off the pizza to the steam escaping into your kitchen happens in a very short time. The oven door should always be closed when cooking to avoid this problem and other issues such as loss of heat during the cooking cycle, uneven cooking due to hot spots on an open oven door, etc. Your local appliance repairman can tell you horror stories about opening an oven while it is still under power.
And another thing: if your pizzas are overcooked after removing them from the grill, try a shorter bake time next time. If they aren’t cooked enough before going into a very hot oven, they will definitely turn out overcooked after the initial burst of heat.
So, what about letting the pizza rest to let steam escape? You might have noticed that some pizzas are cut before it is fully cooled, exposing the cheese and toppings to very high surface temperatures. This causes them to dry up rather quickly leading one to believe that heat loss has indeed taken place during this time. It is important not to judge how well a pizza will keep by how much condensation is visible on the top of it when slicing, as mentioned earlier.
Use a spatula to flip the pizza halfway through cooking time
Flipping the pizza ensures that the top and bottom of the crust will cook evenly. It also speeds up cooking time, helps to keep toppings from sliding off during baking, and allows you to more easily reach the pizza peel for turning. If you don’t flip your pizza over, you will need to rotate it as it bakes so that it cooks evenly on both sides.
Halfway through cooking, rotate the pizza 180-degrees so that part of it is opposite to where it started. That way, if your oven rack was on the second rung from the top when you put the pizza in, it will be on the second rung from the bottom at this point. If you don’t flip or rotate your pizza during cooking, you will need to rotate it as it bakes so that both sides cook evenly.
A crisp crust, bubbling cheese, and sauce that’s beginning to brown are three signs of doneness. We also recommend using an instant-read thermometer to ensure the internal temperature has reached 160 degrees Fahrenheit as recommended by the USDA. That said, there are a few other ways to tell when your pizza is cooked: A few air bubbles on top of the cheese or dough indicate that it may be fully baked. It should also feel light and springy in your hand when you pick up a slice. And a golden-brown bottom means that all of those flavorful compounds created at the Maillard reaction have had time to develop–meaning you’ve got delicious caramelization going on.
How to cook a frozen pizza on a pellet grill? An internal temperature of at least 160° F is another good indicator that your pizza is done. After all, you wouldn’t want anyone getting sick from undercooked dough, so it’s best to check the internal temperature with an instant-read thermometer. We recommend sticking close to the recommended temperature for safety reasons. However, keep in mind that everyone bakes differently–a hot oven or thin pan will produce a much crisper crust than a cooler oven or thicker pan. That said, here are some other ways to tell when your pizza dough is cooked:
1) The bottom of the crust should golden brown and crisp. While all of the bubbling, melted cheese on top is nice to look at for sure, if your dough isn’t cooked through all those delicious sugars from the fermentation process won’t have been given enough time to caramelize. So, if you want a truly amazing pizza crust that will stand up to any topping combination, be sure it’s crisp and golden and brown underneath as well as nicely puffed and light on top!
2) The edge of the crust should be crispy and slightly charred along its circumference, much like a good baguette or ciabatta bread’s crust is. Again, this is a sign that there has been enough time for all those flavorful compounds created during baking to develop–this time thanks to a Maillard reaction.
See more: Best Indoor Grills And Air Fryer Combo – Reviews and Buyer’s Guide 2022
Remember to clean your pellet grill after cooking with high heat or greasy food like bacon or hamburgers – use a fire extinguisher if necessary
– Let the grill cool down for a few minutes. If it is hot to touch, let it cook down further until you can work on it safely.
– Open the bottom and top air vents in order to provide sufficient oxygen for complete combustion of leaving grease particles. Take care not to burn yourself – make sure there are no hot elements near you while doing this! Some grills have an integrated ash drawer in their design that provides a safe place where the ashes will accumulate when opening or closing the air intakes.
– Turn all heat sources off (pellet controller, gas valve). Do not use water or bleach! It will damage your unit and void your warranty!
– When the grill is sufficiently cool, close the air intakes and put a strong plastic bag over the grease tray to catch any falling grease. Now you can safely use water and a brush. The bag will prevent direct contact between water/bleach and your unit. Do not forget to remove the grease tray from its holder before cleaning or else you might damage it if there are still hot residues in it!
– Clean all surfaces with warm water and a brush preferably using an old tooth brush. Some people prefer to use dishwashing liquid instead of regular soap but personally I have never tried this. I would recommend against putting your pellet grill in a dishwasher since high temperature inside your grill might melt some of its parts (e.g. heating element, plastic drip tray holder).
– Remove the grease tray from its holder and clean it by working the collected grease loose with a brush or paper towel. Use warm water to rinse off excess liquid. Put the tray back into place until all surfaces are dry enough to reassemble your grill. If you have a foam filter on top of your air filter make sure not to wet it!
– Once everything is dry again reassemble your pellet grill and restore full functionality (e.g. switch it on and set cooking temperature). Congratulations – your grill is as good as new now!
>>> How to cook a frozen pizza on a pellet grill? See more: How to BBQ Perfect Pizza Neapolitan in The Grill
How to cook a frozen pizza on a pellet grill – Conclusion
How to cook a frozen pizza on a pellet grill? If you want to cook a frozen pizza on your pellet grill, there are some things to remember. First off, the cooking time will be longer than usual. Your best bet is to set it in for about five minutes at least before flipping and another ten minutes when flipped. Second, because of its thickness, your crust may not get crispy enough if you just flip it over after cooking–you might need to take an extra step by pre-cooking the dough with the toppings on top so that they can soften up while baking in their own heat. Finally, have patience! Frozen pizzas generally require more time than fresh ones due to how much water has been removed from them during freezing (which also makes them easier to
The pellet grill is a favorite for many due to its ability to cook food evenly and efficiently. In this blog post, we’ve talked about how you can use your own pellet grill as the perfect way to cook pizza from scratch or from frozen. When it comes time for cleanup, just let the pellets burn off without any ash coming out of them!
And you love pizza, but don’t want to deal with the mess of an oven or stove, then your pellet grill just might be the answer. We’ll cover how to cook a frozen pizza on a pellet grill in this article and also outline some benefits of using one as well. You should consider one of these best pellet grills as your final choice if it’s time for you to buy another outdoor cooking appliance!
If you’ve been considering purchasing a pellet grill, but don’t know which one to get, we hope this article benefits your decision-making process. How to cook a frozen pizza on a pellet grill? It all boils down to what type of cooking experience do you want? Do you want fast and efficient grilling for small meals or are short cooks on the menu more often? Is time saving an important factor in your buying decisions or is it the taste that will make up your mind? Whatever your needs are, there is a perfect pellet grill out there for you! And if not…we have some recommendations waiting right here. Let us help find yours today.
See more: